- WPVivid Backup Plugin Review: Backup, Restore, Stage, and Migrate WordPress Sites
- What is WPVivid Backup Plugin?
- Pros and Cons of the WPVivid Backup Plugin
- Who is the WPvivid Backup Plugin for?
- WPvivid Pricing
- What are the Features of the WPVivid Backup Plugin?
- 1. Back up your WordPress site with ease (Available in Free and Pro Versions)
- 2. Perform site migrations with ease (Available in Free and Pro Versions)
- 3. Restore sites in case of data loss (Available in Free and Pro Versions)
- 4. Perform site staging for development and testing purposes (Available in Free and Pro Versions)
- 5. Migrate from one WordPress site to another (Available in Free and Pro Versions)
- 6. Increase site performance with image optimization (Pro Only Feature)
- 7. Utilize cloud storage dedicated page for backups (Pro Only Feature)
- 8. Schedule automatic backups (Available in Free and Pro Versions)
- 9. Back up database encryption for extra security (Pro Only Feature)
- What are the steps on how to install and use the WPVivid Backup Plugin Pro version?
- Step 1: Download and install WPvivid Pro
- Step 2: Setting up your general backup schedule
- Step 3: Setting up incremental backups – Pro Only
- Step 4: Linking your cloud storage accounts
- Step 5: Scheduling automatic backups before updates (Pro Only)
- Step 6: Restoring backups
- Step 7: Fine-tuning WPvivid's backup settings
- Step 8: Monitoring backup progress
- What are the unique features of WPvivid Backup Plugin Pro Plugin?
- Conclusion
WPVivid Backup Plugin Review: Backup, Restore, Stage, and Migrate WordPress Sites
Backing up your WordPress site is important. It’s one of those things that you don’t think about until it’s too late.
I’ve had my share of website disasters, and I can tell you from experience that it’s not fun. Losing all your content, settings, and plugins is a nightmare.
That’s why I’m such a big fan of the WPVivid Backup Plugin. This plugin makes it easy to back up, restore, stage, and migrate WordPress sites.
In this WPvivid backup plugin review, I’ll take a look at the features of WPVivid and show you how it can help you protect your WordPress site.
What is WPVivid Backup Plugin?
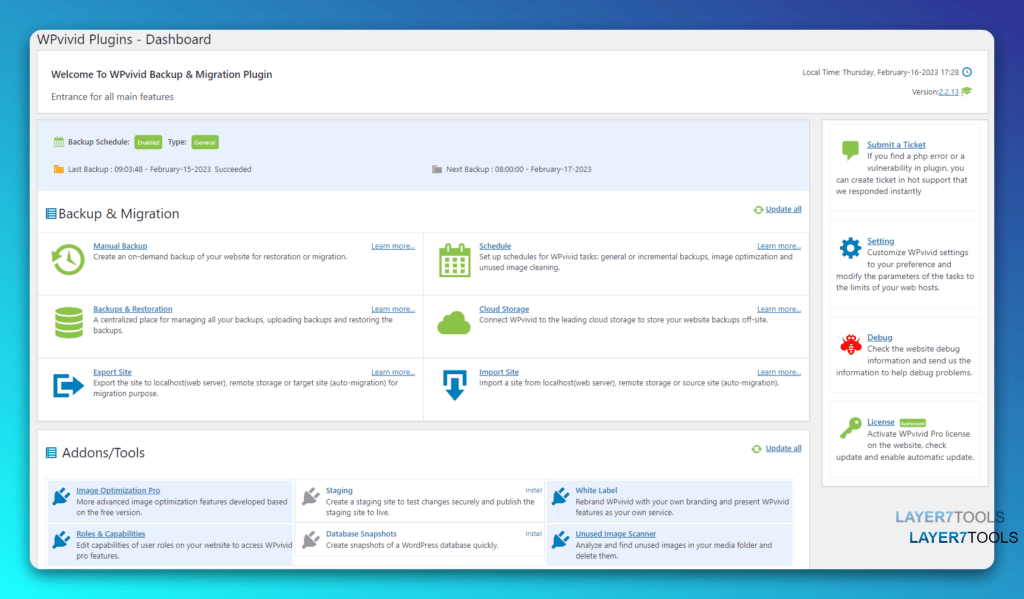
WPvivid Backup Plugin is an all-in-one backup, restore, and migration plugin for WordPress. It is designed to protect websites from attacks by hackers, viruses, or malware, as well as accidents, hardware failure, and other website infirmities, by backing up your entire WordPress-based website to a remote location other than where your website is hosted.
It is currently safeguarding over 500,000 websites and works with WordPress 4.5 and up, requiring PHP version 5.3, Character Encoding UTF-8, and MySQL version 4.1 and up. WPvivid can also support three channels for free.
The plugin offers a simple and user-friendly interface that makes backing up and transferring WordPress websites easy, even for beginners. It also features multiple cloud storage options with five leading cloud drives available free of charge. Other features include one-click migration, trouble-free and effortless backup and restore functions, and access to several remote storage services.
WPvivid is an excellent backup solution for anyone who is serious about their WordPress blog or business website’s online presence and wants to get rid of the hassle of manual backups. With the free version, you can easily back up and migrate your site in just a few clicks, but the paid version includes additional features such as automatic incremental backups, advanced scheduling, staging sites for testing, etc.
Pros and Cons of the WPVivid Backup Plugin
Who is the WPvivid Backup Plugin for?
WPVivid is an affordable and comprehensive backup and migration plugin designed to fit a range of user needs. It is suitable for anyone who is serious about protecting their WordPress blog or website and wants a reliable and automated backup solution. With its affordable prices and wide range of features, WPVivid is an excellent choice for bloggers, businesses, and digital entrepreneurs.
WPvivid Pricing
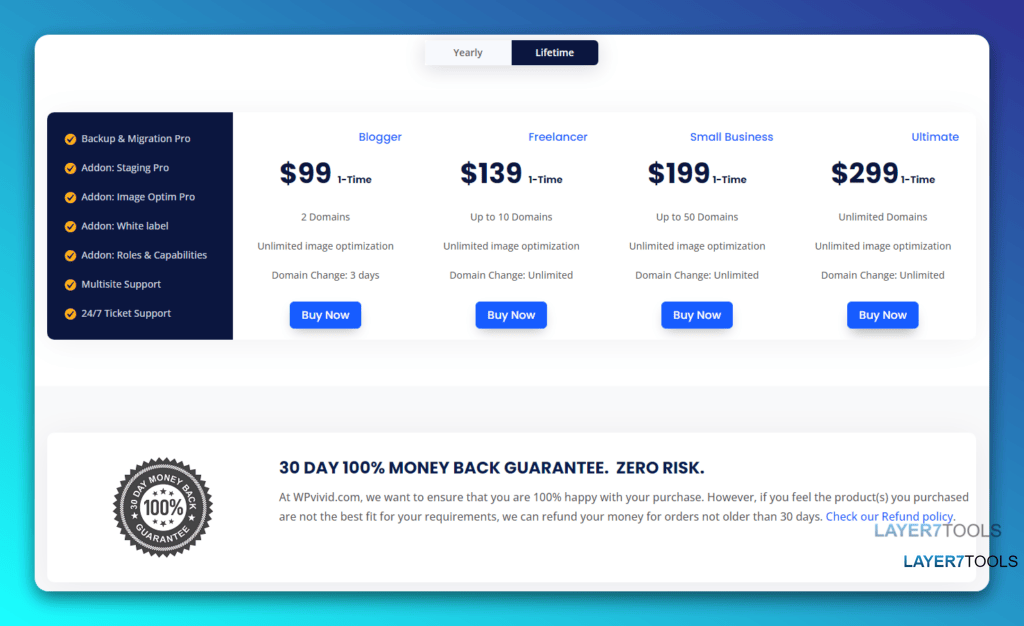
The WPVivid Backup plugin is one of the most affordable WordPress backup plugins on the market. They have different price plans to meet the needs of different customers. The pricing plan starts at $29/year for two websites and goes up to $149/year for an unlimited number of websites.

Additionally, there is a lifetime subscription option that starts at $99 for two websites and $299 for unlimited websites.
All paid plans come with similar features; the only difference is the number of websites you can install them on. All plans come with a 30-day money-back guarantee.
For those looking to test out WPVivid, there is a 14-day free trial that includes all of WPVivid’s premium features. This trial can be used on up to two websites with all features fully unlocked.
What are the Features of the WPVivid Backup Plugin?
1. Back up your WordPress site with ease (Available in Free and Pro Versions)
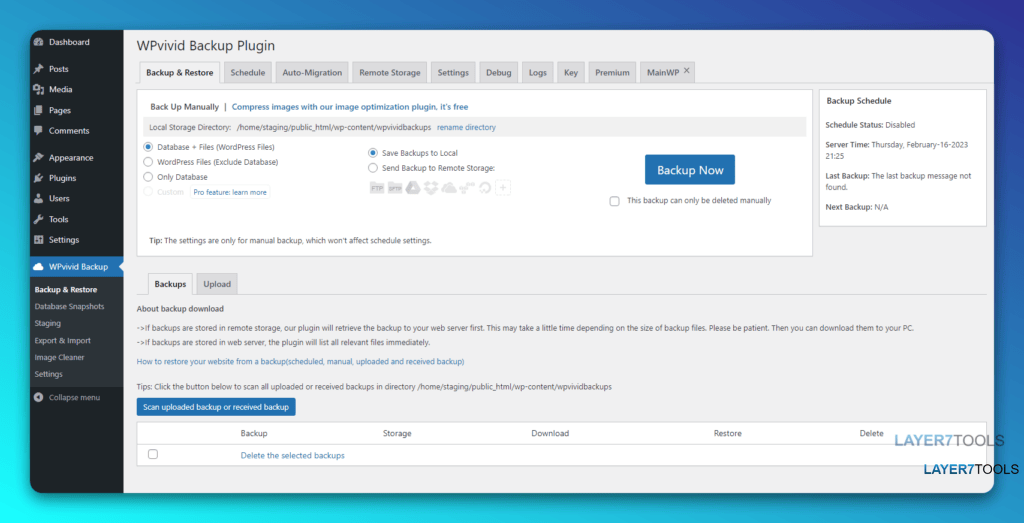
WPVivid Backup Plugin is an easy and efficient way to backup your WordPress site. The plugin offers a variety of features to help with the backup process. Here are the steps to backup your WordPress site using WPVivid Backup Plugin:
- Log in to the administration of your site and install and activate the WPVivid Backup Plugin.
- Schedule a backup of your files and database, either manually or automatically.
- Send the backups to a remote storage location, such as Google Drive, Dropbox, Amazon S3, Microsoft OneDrive, etc.
- Once the backup is created, you can restore your site from your website admin dashboard.
- WPVivid also offers additional features, such as the ability to customize backup content, filter large files, log files, and backup splitting.
By following these steps, you can easily and securely backup your WordPress site using WPVivid Backup Plugin.
2. Perform site migrations with ease (Available in Free and Pro Versions)

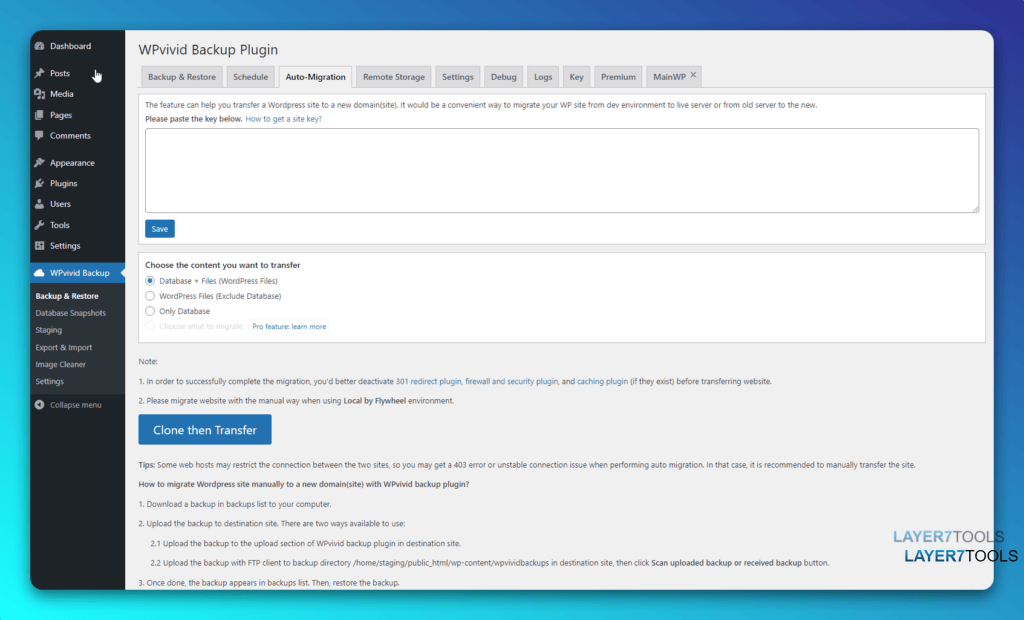
The WPVivid Backup Plugin can help with site migrations in a few simple steps.
First, you must install the plugin on both the source and destination sites. Next, head to the destination site and generate a migration key under the Key tab. After that, visit the Auto-Migration tab in the source website and paste the key. Choose which files you wish to migrate and hit the Transfer button. This will send a backup to the destination site, which you can then restore.
If you are changing domain names, the plugin can replace URLs when you restore them. You can also do a manual migration by uploading the backup file. With the WPVivid Backup Plugin, you can move your entire WordPress site with one click and have the peace of mind that your migrations will be successful and secure.
3. Restore sites in case of data loss (Available in Free and Pro Versions)
The WPVivid Backup Plugin can be used to easily restore websites from a backup with just a click of a button. To do so, users can either go to the Backup/Restore tab, select the backup they want to restore, and click the Restore button. Alternatively, they can upload a backup file, which will then be automatically added to the list of available backups, and then click the Restore button to confirm the restore.
Once the restoration is complete, a notification will appear confirming the success of the restoration. Finally, users should test the website thoroughly to make sure everything works as expected.
4. Perform site staging for development and testing purposes (Available in Free and Pro Versions)

Wpvivid Backup Plugin can be used for site staging for development and testing purposes in a few simple steps.
First, visit the WPvivid Staging tab from the dashboard and click on the ‘Create A Staging Site’ button. This will open a form where you can customize the directory and database configurations of your staging site. You can also exclude specific files and folders as desired. After you’ve finished customizing, click ‘Create Now’ to create the staging site.
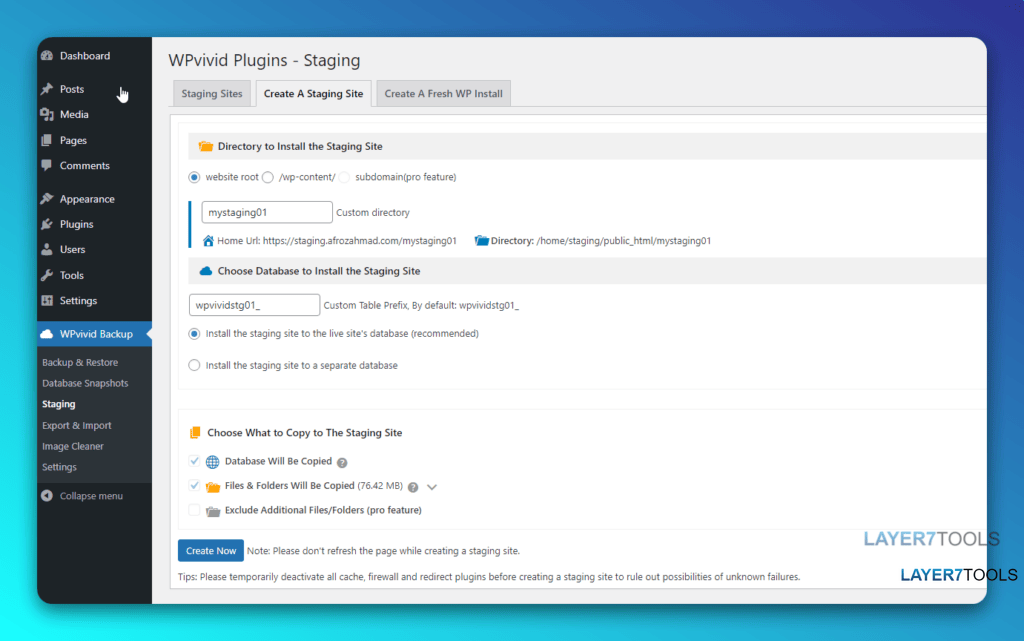
Once the staging site is created, you can freely experiment with the design and features of your blog. When you’re happy with the changes, you can push the modifications live by clicking the ‘Push To Live‘ button. This will allow you to choose which assets will be published on your live site.
If you want to start from scratch, WPvivid also allows you to create a fresh WordPress installation. All you have to do is create a staging site from within your own site, then make the changes you want. When you’re ready to go live, use the ‘Push To Live’ button to publish the changes to your live site.
Using WPvivid Backup Plugin for site staging is a great way to test changes before you make them live. It ensures that any potential problems are avoided and keeps your website safe.
5. Migrate from one WordPress site to another (Available in Free and Pro Versions)
The WPVivid Backup Plugin is an effective tool for WordPress site migration. It allows you to migrate your WordPress site with a single click, supporting multiple types of migrations, such as from a dev environment to a new server, a dev environment to a new domain, or from a live server to another. Additionally, you can migrate your site to a subdirectory, from a.com to b.com, from a.com to a.com/directory, or from a.com to b.com/directory. To migrate your WordPress site, you must first install the WPvivid backup plugin on both domains (sites).
Once the plugin is installed on both sites, follow these steps to complete the migration:
- Visit the destination site and create a migration key by clicking the Generate button in the Key tab.
- Go to the Auto-Migration tab of the origin website and paste the key you generated in the previous step.
- Select whether you want to transfer the entire site, specific files, or just the database.
- Hit the Transfer button to start the migration process.
That’s all you need to do to migrate your WordPress site with the WPVivid Backup Plugin. It’s an easy and convenient way to move your WordPress site from the dev environment to the live server or from the old server to the new one.
6. Increase site performance with image optimization (Pro Only Feature)
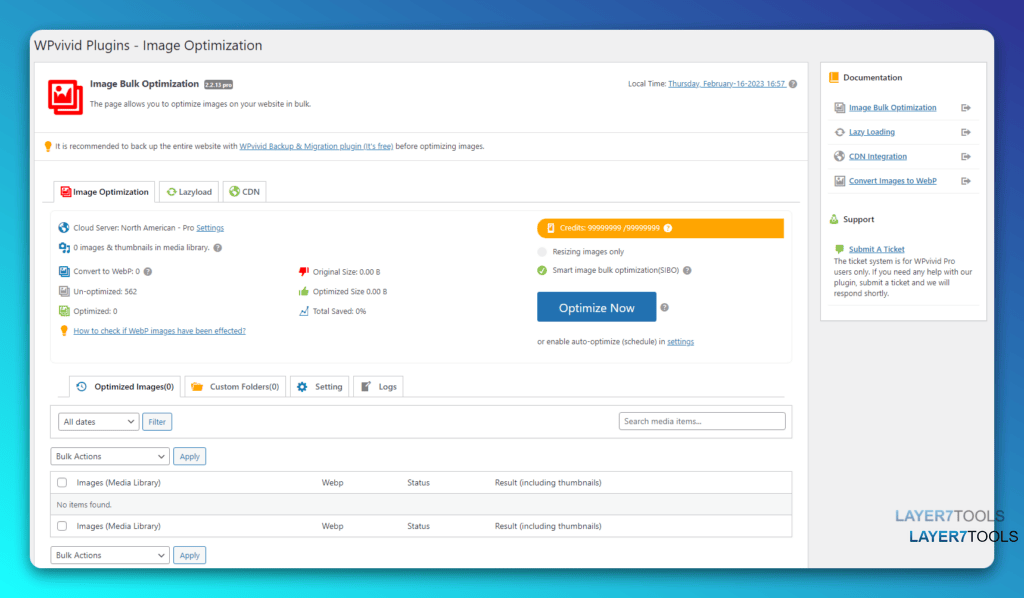
The WPVivid Backup Plugin helps increase site performance through image optimization by providing users with a built-in Image Bulk Optimization tool. This tool allows users to customize their settings by setting an optimization schedule, selecting folders to optimize, and choosing their preferred compression mode. It is recommended that users utilize the “Lossless” compression mode to get a performance boost without compromising image quality.
Additionally, WPVivid allows users to set the plugin to optimize images as soon as they are uploaded by selecting the “Optimize immediately after uploading” option. If users are worried about the results, they can configure WPVivid to create image backups before optimizing them. The plugin also provides users with a “fade in” animation for delayed images, and with the CDN Integration tool, users can enter their CDN URL and enable CDN delivery of content. All these features make WPVivid an invaluable tool for improving website performance through image optimization.
7. Utilize cloud storage dedicated page for backups (Pro Only Feature)
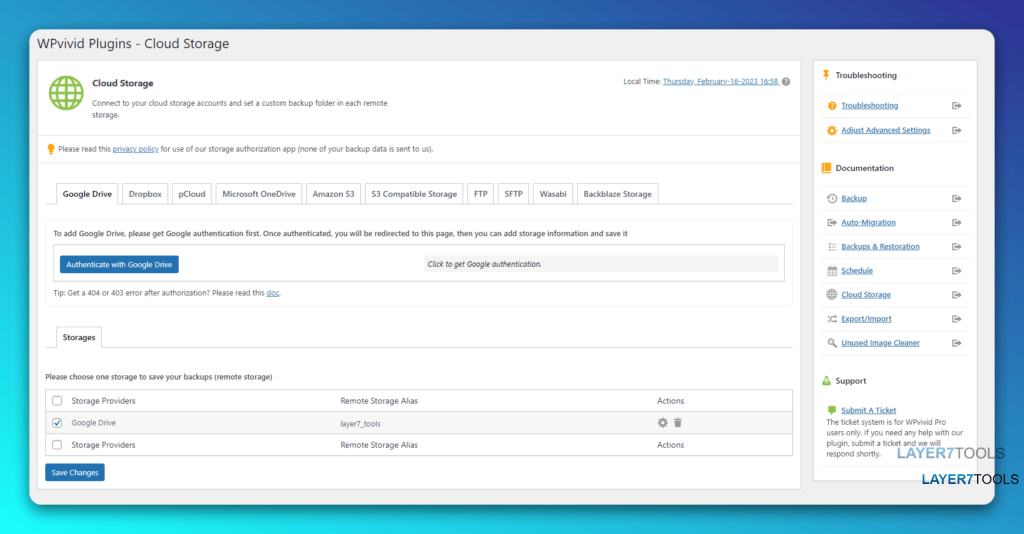
The WPVivid Backup Plugin allows users to easily store their backups in cloud storage services such as Amazon S3, Google Drive, Dropbox, and more. To utilize cloud storage for backups, simply follow these steps:
- Go to the “Cloud Storage” page, either from the WPvivid dashboard or through WordPress’s main menu.
- Give your cloud storage account a name and specify the root directory and the actual folder for your backups.
- Connect your cloud storage account by signing in using your Google account and selecting “Allow” when asked.
- Select your cloud storage account as a backup location when scheduling or creating backups.
- When creating backups, select “Send it to remote storage” during the first step.
By following these steps, you can easily utilize cloud storage for backups using the WPvivid Backup Plugin.
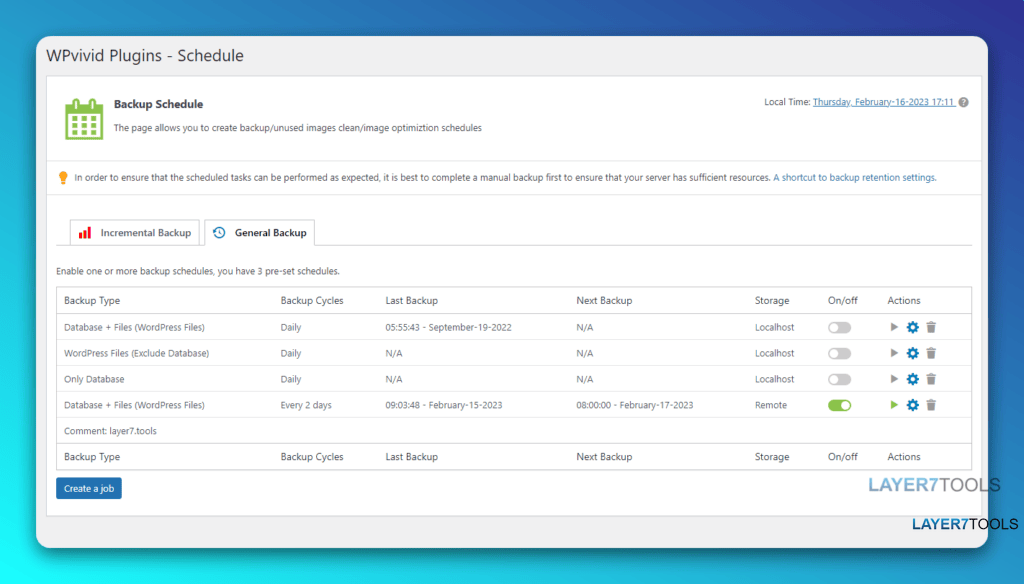
8. Schedule automatic backups (Available in Free and Pro Versions)

The WPVivid Backup Plugin is an essential tool for any WordPress website owner, as it can help you automatically backup your website with ease. The plugin comes with an intuitive interface, making it easy to set up your backup schedule. Here is a step-by-step guide on how to use the WPVivid Backup Plugin to schedule automatic backups:
- Head to the ‘Schedule’ tab in the plugin.
- Tick the ‘Enable backup schedule’ checkbox to enable the schedule.
- Choose the frequency of the backups, such as 12 hours, daily, weekly, fortnightly, or monthly.
- Select what you want to backup – either your entire website (database and files) or just the database and files.
- Decide where you want the backups saved to – either on the local server or to a remote storage site.
- To make sure you don’t accidentally destabilize your website, you can opt to have WPVivid create a backup before updating any plugin, theme, or core CMS file. To do this, head to the ‘Settings’ page and go to the ‘Backup’ tab. Check the ‘Auto-backup before updating’ option. This is one of my favorite options.
- You can also choose if you want to save your automatic backups to a cloud storage service.
With the WPVivid Backup Plugin, you can easily set up your scheduled backups and rest assured that your website is protected.
9. Back up database encryption for extra security (Pro Only Feature)

WPVivid’s database encryption feature allows users to safely secure their backup data using a password of their choice. This is done by enabling the “Database encryption” option on the backup settings page. Once activated, users can enter a password to use when decrypting their backed-up files. This ensures that the data remains secure, even if the WPVivid team is unable to help with the decryption.
Encrypting the database provides an extra layer of security for users, allowing them to have peace of mind that their data is safe from malicious actors.
What are the steps on how to install and use the WPVivid Backup Plugin Pro version?
Step 1: Download and install WPvivid Pro
Installing WPVivid Pro is extremely simple. Here’s a step-by-step guide on how to get started:
- Once you have purchased the WPvivid Pro version, go to your accounts page and download the WPVivid Installer plugin package.
- From the WordPress dashboard, go to the ‘Plugins’ menu, then click ‘Add New.’
- On the ‘Add Plugins’ page, click ‘Upload Plugin’ and use the upload interface to select and install the plugin on your computer.
- Once the installation is complete, click ‘Activate Plugin’ to proceed.
- Go to WPVivid’s ‘License’ page and, enter your license key into the “License” field, then click ‘Activate.’
- Select the checkboxes of the essential WPVivid plugins, i.e. backup tool, image optimization add-on, and staging tool, and then click ‘Install Now.’
- Once the installation is complete, you will have full access to the features of WPVivid Pro.
That’s it. WPVivid Pro is now installed and ready for you to use. Enjoy!
Step 2: Setting up your general backup schedule
- Step 1: To set up your general backup schedule using WPVivid, first open the WPVivid dashboard and click on the “Schedule” tab.
- Step 2: Check the “Enable backup schedule” box to enable automated backups.
- Step 3: Choose the frequency of your backup schedule, whether it be every 12 hours, daily, weekly, fortnightly, or monthly.
- Step 4: Select what files you would like to automatically back up, such as the entire website (database and files) or just the files (excluding database).
- Step 5: Select the backup location, either on your web server or a remote storage service.
- Step 6: Click the “Save Changes” button to activate your backup schedule.
Step 3: Setting up incremental backups – Pro Only

The WPVivid Backup Plugin can be used to create incremental backups, which only back up the changes made since the last full backup. This helps to reduce the size of the backup files and makes it easier to restore your site. To set up an incremental backup schedule, follow these steps:
- Go to the ‘Backup Schedule’ page and click ‘Edit’ to start creating an incremental backup schedule.
- Configure your backup settings for the incremental schedule, such as selecting the assets to be included and the backup location.
- Switch on the toggle for “Enable Incremental Backup Schedule” and save the changes.
- You can choose to create a full backup as soon as your incremental backup schedule is enabled.
- Remember that enabling incremental backups will disable your general backup schedules.
- On the “Settings” page, go to the ‘Backup’ tab and look for the option “Auto-backup before updating.” This will prompt WPvivid to create a backup right before WordPress updates any plugin, theme, or core CMS file.
- You can also choose to save your automatic backups to a cloud storage service.
Step 4: Linking your cloud storage accounts

Using the WPVivid Backup Plugin, you can easily link your cloud storage accounts for secure remote backups. Here are the steps for setting up the remote storage of your choice:
- Go to the WPvivid Backup dashboard, or access the plugin through WordPress’s main menu.
- Then click on the “Cloud Storage” tab, and choose the preferred remote storage provider.
- Enter the required information and click on the “Authenticate” button.
- You will be asked to sign in using your account credentials and then click “Allow” to complete the authentication.
- Once done, you can now select the current service as your default remote storage option.
- You can also specify the number of backup copies that will be saved in your cloud storage.
- When you’re ready to create a backup, select “Send it to remote storage” during the first step.
- After that, your backups will be securely stored in your cloud storage.
Step 5: Scheduling automatic backups before updates (Pro Only)
Using the WPVivid Backup Plugin, you can easily schedule automatic backups before updates in a few simple steps.

Go to the “Settings” page and select the ‘Backup’ tab. Look for the option “Auto-backup before updating” and enable this feature. You can choose if you want the backups to be stored on your local server or sent to a remote storage site.
Next, you can schedule a backup frequency: every 12 hours, daily, weekly, fortnightly, or monthly. You can also choose to back up the entire website (database and files) or just the database or files.
Finally, save your changes, and the plugin will now automatically create backups before updates at the frequency you set. Your backups will be stored in a folder called “rollback” under the root directory you created.
By scheduling automatic backups with WPVivid, you can save yourself plenty of time and keep your website backed up and secure.

Step 6: Restoring backups
- To begin, head to the “Backups & Restoration” page and look for the available backups in the storage location you are using. If the desired backup doesn’t appear, try using the “scan” feature to prompt WPvivid to check the selected directory again.
- Once you’ve found the desired backup, you can download or restore it with one click. You can also click ‘Details’ to view the contents of each backup. To delete a backup, click the trash can icon or select their checkbox and click ‘Delete the selected backups.’
- If other backup files exist, you can consolidate them with your WPvivid backups using the upload tool. Just switch to the ‘Upload’ tab and drop your backup files or click ‘Select Files’ to begin the process.
- To restore a backup, go to the Back-up and Restore Tab and scroll down to the lower portion where the Backup and Upload Tabs are located. Choose the latest backup you’ve made, and in the second to the last column, under Restore, click on the circle button. This will automatically create a backup at regular intervals, which you can choose to back up the entire website or just the database or files.
- Additionally, you can easily restore your site to any of the available backup dates, but note that restoration will overwrite your current site, and you cannot choose to restore a specific file only.
With the WPVivid Backup Plugin, you can store up to 7+ backups at a time, set a custom backup schedule, include or exclude backup files, connect to remote storage, stage your site, and encrypt your database. Furthermore, the plugin supports WordPress multisite backup, custom migration, and backup splitting and provides 24/7 dedicated support and white-label editing.
Step 7: Fine-tuning WPvivid’s backup settings
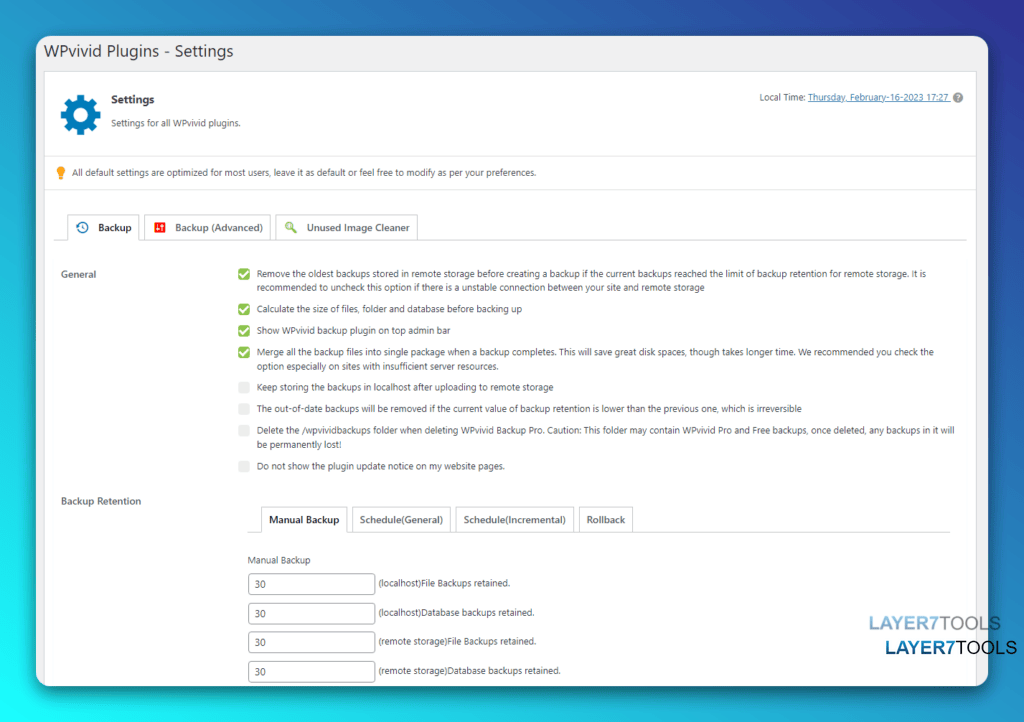
- Go to the WPVivid Settings tab.
- Enable “Backup splitting by size” to avoid host limits on large zip files.
- Set the size limit of files you want to exclude from the backup.
- Set the PHP script execution timeout to prevent time-out errors.
- Rename the backup folder, which is “wpvividbackups” by default.
- Enable the archiving feature for backups.
- Select how many backups to retain (default is 3).
- Select whether to compress the backup (compressing will make it smaller but take more server resources).
- Enable the “Database encryption” option.
- Enter a password that you’d like to use when decrypting your backup files.
- Set up email reports so that WPvivid can send you a notification once a backup job is completed.
- Select whether to attach a log to each email or use a custom email subject.
- Enable “eco” mode if your backup tasks won’t finish on a shared host.
- Enable the “Compress and archive” option if you want WPvivid to compress and archive your backups to save storage space.
- Choose whether to use the default access method, WPDB or PDO, for faster performance.
- Modify additional parameters that control your backup’s sizes, execution times, memory usage, and so on.
Step 8: Monitoring backup progress
The WPVivid Backup Plugin provides a live backup progress bar so that you can keep track of the backup process and know when it is completed. To monitor the progress of a backup, follow these steps:
- Go to the WPvivid Backup area in your WordPress dashboard.
- On the main dashboard, you should be able to see the progress bar which will indicate the progress of your backup.
- You can also view the progress log in the Backup Logs tab. This will show the detailed progress of the backup, including the start and end time and the amount of data backed up.
- Once the backup is completed, you will be notified via email. The amount of data backed up and the time taken for the task will also be indicated in the email.
By using the WPVivid Backup Plugin, you can easily monitor the progress of a backup and ensure that it is completed successfully.
What are the unique features of WPvivid Backup Plugin Pro Plugin?
- Auto-Migration Feature – This allows you to automatically migrate your site to a new host without having to manually export and import database tables.
- Backup Scheduling with General and Incremental Options – You can set backups to run automatically, so you don’t have to worry about manually running them.
- Site Cloning Feature – This allows you to copy one site and create a new site with the same content.
- Database Encryption – This allows you to encrypt the backup files, ensuring that only authorized users can access them.
- Integration with Cloud Storage Services – This allows you to store backups on cloud storage services, such as Dropbox, Amazon S3, and more.
- Image Optimization Settings – Allows you to choose the quality of images when backing up, reducing the size of the backup.
- Custom Migration Options – This allows you to customize the migration process to meet the needs of your website.
- Migration Planning Auto-Migration – This allows you to plan your migration before it happens, so you don’t have to worry about any issues.
- Off-Site Backups – Allows you to store backups of your site in a location other than your main hosting account, like Google Drive, Amazon s3, etc.
- Flexible Restore Options – Allows you to choose what and how you want to Restore.
- Scheduling automatic backups before updates (Pro Only).
Conclusion
The WPvivid Backup Plugin offers an easy and effective way to ensure that your website is backed up in case of any issues. With features such as flexible backup and restore options, site migration, staging, database encryption, cloud storage integration, image optimization, white labeling, and more, it’s no wonder why the WPvivid Backup Plugin is considered one of the best backup plugins available. Whether you’re a beginner, an experienced user, or an agency, this plugin has everything you need to make sure your website is safe and backed up properly.
- WPVivid Backup Plugin Review (2023): Backup, Restore, Stage, and Migrate WordPress Sites - March 1, 2023
- How to Write Better Outlines with ChatGPT (Including Prompts) - February 3, 2023
- How to Write good headlines that grab attention and drive conversions - January 27, 2023